PF
Popcorn Free
← Back to Blog

California Ceiling vs Popcorn Ceiling

California Ceiling vs Popcorn Ceiling

California Ceiling vs Popcorn Ceiling: What's the Difference?

If you're researching ceiling options for your Toronto home, you've probably come across the terms "California ceiling" and "popcorn ceiling." While they're both textured ceiling styles, they're quite different in appearance, application, and removal. Let's break it down.

What Is a Popcorn Ceiling?

A popcorn ceiling (also called an acoustic ceiling removal or cottage cheese ceiling) features a bumpy, spray-on texture that resembles — you guessed it — popcorn. This style was extremely popular in Toronto homes built from the 1950s through the 1980s.

Characteristics of popcorn ceilings:

  • Bumpy, irregular texture
  • Spray-applied using a hopper gun
  • Often contains Styrofoam beads or vermiculite
  • May contain asbestos (pre-1990 homes)
  • Difficult to clean and maintain
  • Collects dust and cobwebs easily
  • Yellows over time, especially in kitchens and bathrooms
  • What Is a California Ceiling?

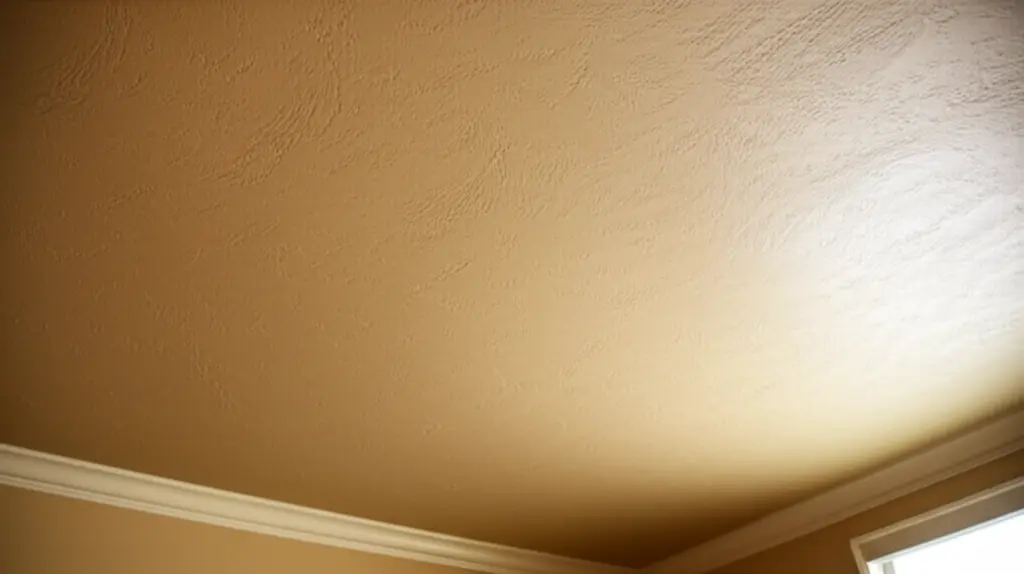
    A California ceiling (also called a California knockdown or skip trowel ceiling) is a more refined textured finish. It's created by applying joint compound or plaster with a trowel, then lightly "knocking down" the peaks to create a flattened, organic pattern.

    Characteristics of California ceilings:

  • Flattened, organic texture with subtle peaks and valleys
  • Applied with a trowel or hopper, then knocked down
  • More sophisticated appearance than popcorn
  • Easier to clean than popcorn
  • Can be painted more easily
  • Popular in Mediterranean and Spanish-style homes
  • Key Differences at a Glance

    FeaturePopcorn CeilingCalifornia Ceiling
    TextureBumpy, roughFlat, organic pattern
    ApplicationSpray-onTrowel + knockdown
    AppearanceCottage cheese-likeMediterranean/modern
    CleaningVery difficultModerately easy
    PaintingDifficultRelatively easy
    Dust collectionHighModerate
    Asbestos riskHigh (pre-1990)Low
    Removal difficultyModerateModerate to high

    Which Is More Common in Toronto?

    In the Greater Toronto Area, popcorn ceilings are far more common. The massive suburban building boom of the 1960s–1980s in areas like Scarborough, North York, Etobicoke, Mississauga, and Brampton resulted in thousands of homes with popcorn ceilings.

    California ceilings are less common in Toronto but can be found in:

  • Custom-built homes from the 1990s–2000s
  • Renovated homes where owners chose knockdown over smooth
  • Some newer builds in Vaughan and Oakville
  • Can You Convert a Popcorn Ceiling to a California Ceiling?

    Yes! Some Toronto homeowners choose to convert their popcorn ceiling to a California knockdown texture guide rather than going fully smooth. The process involves:

  • Removing the existing popcorn texture
  • Repairing and priming the drywall
  • Applying new knockdown texture
  • Painting the finished ceiling
  • However, most of our clients at Popcorn Free prefer a completely smooth vs popcorn ceiling comparison — it's the most modern, clean look and adds the most value to your home.

    Removal: Popcorn vs California Ceiling

    Popcorn ceiling removal is generally more straightforward. The texture is often water-soluble and can be scraped off after wetting. Our dustless removal method makes this process clean and efficient.

    California ceiling removal can be more challenging because the compound is denser and more firmly bonded to the drywall. It often requires more aggressive scraping or skim coating.

    What Toronto Homeowners Are Choosing in 2026

    The overwhelming trend in Toronto's real estate market is toward smooth, flat ceilings. Here's why:

  • Modern aesthetics — Smooth ceilings look clean and contemporary
  • Better lighting — Smooth surfaces reflect light evenly
  • Higher [impact on home value](/blog/popcorn-ceiling-home-value-impact) — Buyers prefer smooth ceilings
  • Easier maintenance — No texture to trap dust or stain
  • Better for painting — Smooth surfaces accept paint evenly
  • Real estate agents in the GTA consistently report that homes with smooth ceilings sell faster and for more money than homes with textured ceilings.

    Transform Your Ceiling with Popcorn Free

    Whether you have a popcorn ceiling, California ceiling, stipple ceiling, or any other textured ceiling — Popcorn Free can transform it into a perfectly smooth, modern surface.

    Our dustless removal method ensures minimal mess, and our team is fully licensed and insured. We serve Toronto, Mississauga, Brampton, Vaughan, Markham, Oakville, Richmond Hill, and the entire GTA.

    ---

    šŸ“š Related Guides

  • [Ceiling Finishing Options Guide](/blog/ceiling-finishing-options-guide) — Our comprehensive pillar guide
  • Call 289-806-1616 for a free estimate and discover how easy it is to modernize your ceilings.

    The Installation Process: California vs Popcorn

    Understanding how each ceiling type is installed helps explain the differences in removal and cost.

    How Popcorn Ceilings Are Installed

  • Surface prep — Drywall is primed to ensure adhesion
  • Mixing — Spray texture is mixed in a hopper (often pre-mixed bags with Styrofoam, perlite, or vermiculite)
  • Spraying — A hopper gun sprays the texture onto the ceiling in overlapping passes
  • Drying — Texture dries within 24–48 hours
  • Optional painting — Some popcorn ceilings are left unpainted (white texture), others receive a coat of ceiling paint
  • The entire process for a room takes about 2–3 hours, which is why popcorn was so popular with builders — it was fast and cheap.

    How California Knockdown Ceilings Are Installed

  • Surface prep — Drywall is sanded and primed
  • Base coat — A thin layer of joint compound is sometimes applied first
  • Texture application — Joint compound is sprayed or troweled onto the ceiling
  • Wait time — The compound is allowed to set slightly (10–15 minutes)
  • Knockdown — A wide knife is dragged across the surface to flatten the peaks, creating the characteristic flat-topped pattern
  • Drying — Full cure takes 24–48 hours
  • Painting — California ceilings are typically painted after drying
  • This process takes about 4–6 hours per room due to the additional knockdown step and the skill required for an even result.

    Cost Comparison: Installation and Removal

    Cost FactorPopcorn CeilingCalifornia Ceiling
    Installation cost (per sq ft)$1.00–$2.00$2.00–$4.00
    Removal cost (per sq ft)$2.00–$4.50$2.50–$5.50
    Repair after removalUsually minimalOften more extensive
    Time to remove (per room)4–6 hours5–8 hours
    Smooth finish achievable?Yes — excellent resultsYes — may need more skim coating

    Which Adds More Home Value When Removed?

    Both ceiling types benefit significantly from removal and smooth finishing. However, in the Toronto real estate market, removing popcorn ceilings tends to have a larger perceived impact because popcorn texture is more universally disliked by buyers.

    California knockdown is sometimes acceptable to buyers in certain home styles (Mediterranean, Spanish colonial), so removing it may be less urgent unless you're going for a fully modern aesthetic.

    Toronto and GTA Trends in 2026

    Across the Greater Toronto Area — from Mississauga and Brampton to Vaughan, Markham, and Oakville — the trend is unmistakably toward smooth ceilings. New construction in the GTA almost exclusively features smooth drywall ceilings, setting buyer expectations accordingly.

    Explore all your ceiling texture options after removal and learn about stucco ceiling removal if you have a heavier texture. For pricing details, see our guide on popcorn ceiling removal cost in Toronto.

    Contact Popcorn Free today — Toronto's ceiling texture experts.

    Diving Deeper: Asbestos Concerns in Toronto Homes

    One of the most pressing concerns for homeowners in older Toronto homes, particularly those built before 1990, is the potential presence of asbestos in popcorn ceilings guides. Asbestos was a common additive in building materials for its fire-retardant and insulating properties.

    Why Asbestos Is Dangerous

    Asbestos fibers, when inhaled, can cause serious and even fatal diseases, including:

  • Mesothelioma: — A rare and aggressive cancer affecting the lining of the lungs, abdomen, or heart.
  • Lung Cancer: — Asbestos exposure significantly increases the risk of lung cancer, especially for smokers.
  • Asbestosis: — A chronic, progressive lung disease caused by scarring from inhaled asbestos fibers.
  • Identifying Asbestos in Your Ceiling

    The only way to definitively determine if your popcorn ceiling contains asbestos is through professional testing. Do NOT attempt to disturb the ceiling yourself, as this can release asbestos fibers into the air.

    Here's the recommended process:

  • Hire a certified [asbestos testing in Toronto](/blog/popcorn-ceiling-testing-toronto) company: Look for a company licensed by the Ontario Ministry of Labour, Training and Skills Development. They will take a small sample of your ceiling for laboratory analysis.
  • Wait for lab results: The lab will provide a report indicating whether asbestos is present and, if so, its concentration.
  • If asbestos is present: Contact a licensed asbestos abatement contractor for safe removal. [Contact Popcorn Free](/toronto) to discuss your options.
  • Asbestos Abatement: A Safe and Professional Approach

    Asbestos abatement is a specialized process that requires strict adherence to safety regulations to prevent fiber release. Here's what a professional asbestos removal involves:

  • Containment: The work area is sealed off with plastic sheeting and negative air pressure is established to prevent fibers from escaping.
  • Personal Protective Equipment (PPE): Workers wear respirators, Tyvek suits, and gloves to protect themselves from exposure.
  • Wetting: The popcorn ceiling is wetted down to minimize dust generation.
  • Removal: The asbestos-containing material is carefully removed and placed in sealed containers.
  • Disposal: The waste is disposed of at a designated asbestos disposal site.
  • Clearance Testing: After removal, air samples are taken to ensure the area is safe for re-occupancy.
  • Important Note: Asbestos abatement should ONLY be performed by licensed and experienced professionals. Attempting to remove asbestos yourself is illegal and extremely dangerous.

    DIY vs. Professional Removal: Weighing the Options

    While some homeowners might be tempted to tackle popcorn or California ceiling removal as a DIY project, there are several factors to consider before making that decision:

    DIY Considerations

    Pros:

  • Cost savings (potentially)
  • Flexibility in scheduling
  • Cons:

  • Asbestos risk: — If your ceiling contains asbestos, DIY removal is extremely dangerous and illegal.
  • Time and effort: — Ceiling removal is a labor-intensive and messy job.
  • Skill required: — Achieving a smooth, professional-looking finish requires experience with drywall repair and skim coating.
  • Dust and mess: — Without proper dust control measures, DIY removal can create a significant mess in your home.
  • Potential for damage: — Inexperienced removal can damage the drywall, requiring more extensive repairs.
  • Professional Considerations

    Pros:

  • Safety: — Professionals are trained and equipped to handle asbestos and other hazards safely.
  • Efficiency: — Professionals can complete the job much faster than a DIYer.
  • Quality: — Professionals have the skills and experience to achieve a smooth, flawless finish.
  • Convenience: — You don't have to lift a finger!
  • Peace of mind: — You can rest assured that the job is done correctly and safely.
  • Dustless removal methods: — Companies like Popcorn Free use specialized equipment to minimize dust and mess.
  • Cons:

  • Higher upfront cost
  • Our Recommendation: For most Toronto homeowners, professional removal is the best option, especially if there's any chance of asbestos. The peace of mind, safety, and quality of workmanship are well worth the investment.

    Enhancing Your Home's Lighting After Ceiling Removal

    One of the most significant benefits of removing textured ceilings and opting for a smooth finish is the dramatic improvement in your home's lighting. Textured ceilings, especially popcorn ceilings, tend to absorb light, making rooms feel darker and smaller. Smooth ceilings, on the other hand, reflect light more effectively, creating a brighter and more airy atmosphere.

    Here are some ways to enhance your home's lighting after ceiling removal:

  • Choose light-colored paint: — Lighter colors reflect more light than darker colors. Opt for a bright white or off-white for your ceiling to maximize light reflection.
  • Install recessed lighting: — Recessed lights provide a clean, modern look and can be strategically placed to illuminate specific areas of the room. Consider LED recessed lights for energy efficiency and long lifespan.
  • Add a statement chandelier or pendant light: — A beautiful chandelier or pendant light can serve as a focal point in the room and provide ample ambient lighting.
  • Use dimmers: — Dimmers allow you to control the intensity of your lights, creating a more flexible and comfortable lighting environment.
  • Consider natural light: — Maximize natural light by keeping windows clean and unobstructed. Use sheer curtains or blinds to allow light to filter into the room while maintaining privacy.
  • Lighting in Different Rooms:

  • Living Room: — Combine ambient lighting (recessed lights or a chandelier) with task lighting (floor lamps or table lamps) to create a versatile and inviting space.
  • Kitchen: — Focus on task lighting to illuminate countertops and work areas. Consider under-cabinet lighting to provide additional illumination for food preparation.
  • Bedroom: — Create a relaxing and calming atmosphere with soft, diffused lighting. Use bedside lamps for reading and a dimmer for overhead lighting.
  • Bathroom: — Ensure adequate lighting for grooming and hygiene. Consider vanity lighting around the mirror and a recessed light in the shower area.
  • Understanding the Skim Coating Process for a Perfect Finish

    After removing a popcorn or California ceiling, the underlying drywall often requires repair and preparation before painting. This is where skim coating comes in. Skim coating is the process of applying a thin layer of joint compound over the entire ceiling to create a smooth, even surface.

    Why Is Skim Coating Necessary?

  • Fills imperfections: — Skim coating fills in any dents, scratches, or gouges in the drywall caused by the removal process.
  • Hides seams: — It helps to blend the seams between drywall sheets, creating a seamless look.
  • Provides a uniform surface: — Skim coating ensures that the ceiling has a consistent texture, which is essential for a smooth paint finish.
  • Improves adhesion: — It provides a better surface for paint to adhere to, resulting in a longer-lasting and more durable finish.
  • The Skim Coating Process

  • Preparation: The ceiling is cleaned and sanded to remove any loose debris or imperfections.
  • Priming: A coat of drywall primer is applied to the ceiling to improve adhesion and prevent the joint compound from drying too quickly.
  • Application: A thin layer of joint compound is applied to the ceiling using a wide taping knife. The compound is spread evenly and smoothly, filling in any imperfections.
  • Sanding: Once the compound is dry, it is sanded smooth using a fine-grit sandpaper. This step is crucial for achieving a flawless finish.
  • Second Coat (if needed): In some cases, a second coat of skim coating may be necessary to fill in any remaining imperfections.
  • Final Sanding: After the second coat is dry, it is sanded smooth.
  • Priming (again): Another coat of primer is applied to the ceiling to seal the surface and prepare it for painting.
  • Tips for a Successful Skim Coat:

  • Use a high-quality joint compound.
  • Apply thin, even coats.
  • Sand thoroughly between coats.
  • Use a sanding pole for easier reach.
  • Wear a dust mask to protect yourself from dust.
  • Consider hiring a professional for the best results.
  • Exploring Alternative Ceiling Texture Options (Besides Popcorn and California)

    While smooth ceilings are the current trend, some homeowners may still prefer a textured ceiling for aesthetic reasons. If you're looking for alternatives to popcorn and California ceilings, here are a few options to consider:

  • Orange Peel: — A subtle texture that resembles the surface of an orange peel. It's applied using a spray gun and is relatively easy to clean.
  • Stipple: — A heavier texture than orange peel, with larger, more pronounced bumps. It's also applied using a spray gun and can be customized to create different patterns.
  • Swirl: — A decorative texture created by applying joint compound with a brush or trowel in a swirling motion. It adds a unique and artistic touch to the ceiling.
  • Venetian Plaster: — A luxurious and sophisticated finish that resembles polished marble. It's applied in multiple layers and requires a high level of skill to achieve a flawless result.
  • Wood Planks or Beams: — Adding wood planks or beams to the ceiling can create a warm and rustic look. They can be installed directly over the drywall or suspended from the ceiling.
  • Tin Tiles: — Tin tiles are a classic and elegant option that can add character and charm to any room. They are available in a variety of patterns and finishes.
  • Before choosing a texture, consider the style of your home, your personal preferences, and the overall look you want to achieve. It's also a good idea to consult with a professional to get their advice and recommendations.

    How to Choose the Right Contractor for Ceiling Removal in Toronto

    Selecting the right contractor for your ceiling removal project in Toronto is crucial for a successful and stress-free experience. Here are some key factors to consider when making your decision:

  • Licensing and Insurance: — Ensure that the contractor is properly licensed and insured to operate in Toronto. This protects you from liability in case of accidents or damages.
  • Experience: — Choose a contractor with extensive experience in popcorn and California ceiling removal. Ask for references and check their online reviews.
  • Asbestos Certification: — If your home was built before 1990, verify that the contractor is certified to handle asbestos-containing materials.
  • Dustless Removal Methods: — Opt for a contractor who uses dustless removal methods to minimize mess and protect your family's health.
  • Clear Communication: — The contractor should be able to communicate clearly and answer all of your questions thoroughly.
  • Detailed Quote: — Get a detailed quote that outlines all of the costs involved in the project, including removal, repairs, skim coating, and painting.
  • [warranty information](/blog/popcorn-ceiling-removal-warranty): — Ask about the contractor's warranty on their workmanship.
  • Local Reputation: — Check the contractor's reputation in the Toronto area. Look for reviews on Google, Yelp, and other online platforms.
  • Portfolio of Work: — Ask to see examples of their previous ceiling removal projects.
  • By carefully considering these factors, you can choose a contractor who is qualified, experienced, and reliable, ensuring a smooth and successful ceiling removal project in your Toronto home.

    Frequently Asked Questions

    How long does popcorn ceiling removal typically take in a Toronto home?

    The time it takes to remove a popcorn ceiling depends on the size of the room, the complexity of the job, and whether asbestos is present. A typical room (12x12) can take anywhere from 4-8 hours for removal and another 1-3 days for skim coating and painting. Contact us for a specific timeframe.

    Is popcorn ceiling removal messy? What precautions do you take?

    Traditional popcorn ceiling removal can be very messy. However, Popcorn Free uses dustless removal methods to minimize dust and debris. We use HEPA-filtered vacuums and seal off the work area to contain the mess.

    Do I need to leave my home during the popcorn ceiling removal process?

    It's generally recommended that you leave your home during the removal process, especially if asbestos is present. Even with dustless methods, there may be some residual dust. We can discuss the best options for your family's comfort and safety.

    How much does California ceiling removal cost in the GTA?

    The cost of California ceiling removal varies depending on the size of the area, the complexity of the texture, and the amount of repair work required. On average, you can expect to pay between $2.50 and $5.50 per square foot. Contact Popcorn Free for a free, no-obligation estimate.

    Transform your home with smooth, modern ceilings. Call Popcorn Free today at 1-289-806-1616 for a free estimate!

    Get Your Free Estimate

    Professional popcorn ceiling removal in Toronto & GTA. Dustless method, licensed & insured.