Knockdown Ceiling Texture: Everything You Need to Know
Knockdown ceiling texture is one of the most popular ceiling finishes in modern homes across Toronto and the GTA. Whether you are considering applying knockdown texture, removing it, or deciding between knockdown and other finishes, this comprehensive guide covers everything you need to know about knockdown texture for your ceiling.
At Popcorn Free, we apply and remove knockdown texture across the Greater Toronto Area. Call 289-806-1616 for expert advice and free estimates.
What Is Knockdown Ceiling Texture?
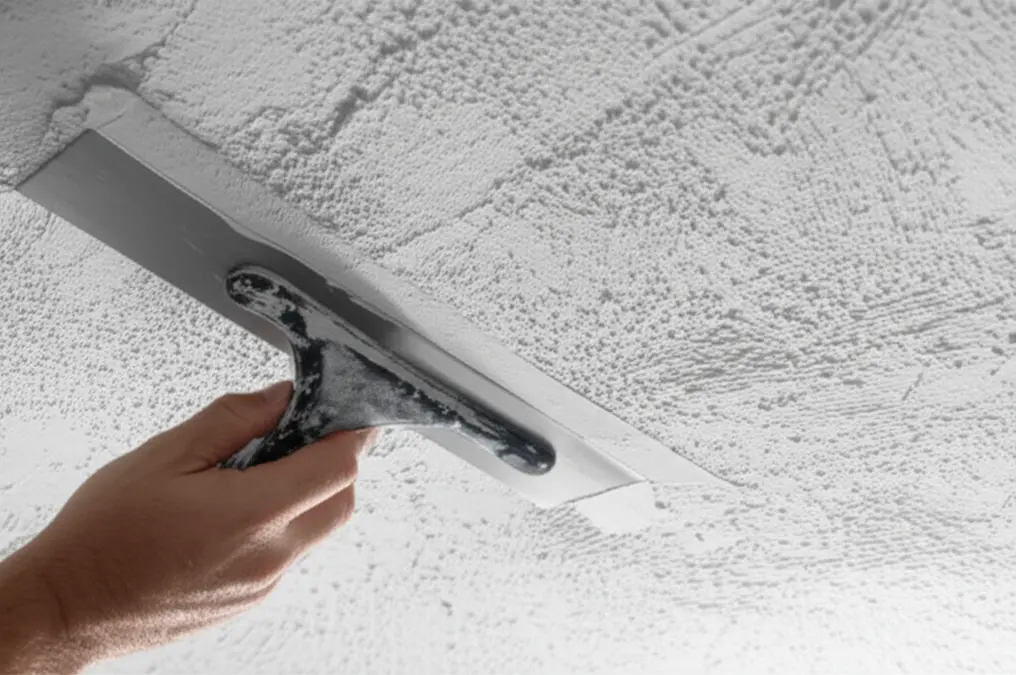
Knockdown texture is a ceiling finish created by spraying joint compound or drywall mud onto the ceiling surface and then "knocking down" the peaks with a wide drywall knife. The result is a subtle, mottled pattern that resembles stucco or aged plaster but is much flatter and more refined.
The finish gets its name from the knocking-down step — after the compound is sprayed in a random splatter pattern, the high points are smoothed flat with a knockdown knife, leaving irregular flat patches with slight texture between them.
Knockdown vs. Other Textures
| Texture Type | Appearance | Application | Popularity |
|---|---|---|---|
| **Knockdown** | Flat mottled patches | Spray + flatten | High — modern choice |
| **Orange Peel** | Fine bumpy surface | Spray only | Moderate |
| **Popcorn** | Heavy cottage cheese | Spray only | Low — dated |
| **Stipple** | Pointed peaks | Roll or stomp | Low — dated |
| **Smooth** | Perfectly flat | Skim coat + sand | Highest — premium |
| **Skip Trowel** | Subtle hand-applied | Hand trowel | Moderate — artisan |
Cost of Knockdown Ceiling Texture
Application Costs
Applying knockdown texture to a new or prepared ceiling:
Knockdown Texture Removal Costs
Removing knockdown texture to achieve a smooth ceiling:
Knockdown Over Popcorn
Applying knockdown texture over existing popcorn ceiling (as an alternative to full removal):
Pros of Knockdown Ceiling Texture
Hides Imperfections
Knockdown texture is excellent at hiding minor ceiling imperfections like drywall joints, slight unevenness, nail pops, and hairline cracks. This makes it a practical choice for ceilings that are not perfectly smooth.
More Modern Than Popcorn
Knockdown is considered a contemporary texture option. While smooth vs popcorn ceiling comparisons are the most popular choice, knockdown offers visual interest without looking dated like popcorn or stipple textures.
Cost-Effective Application
Applying knockdown texture costs less than achieving a perfect Level 5 smooth finish because it does not require the same degree of skim coating and sanding. For budget-conscious homeowners, knockdown offers a good balance of appearance and cost.
Adds Subtle Visual Interest
Knockdown texture creates gentle light and shadow patterns on the ceiling that some homeowners prefer over the stark appearance of a perfectly smooth surface. It adds warmth and character to a room.
Easier Repairs
When knockdown ceilings are damaged, repairs blend more naturally than on smooth ceilings. The irregular pattern makes patches less visible, which is a practical advantage.
Cons of Knockdown Ceiling Texture
Not as Clean as Smooth
While better than popcorn, knockdown texture still collects some dust and is harder to clean than a smooth surface. The ridges and valleys, though subtle, trap particles over time.
Less Resale Appeal
In the Toronto and GTA real estate market, smooth ceilings are the gold standard. Some buyers may view knockdown texture as an additional renovation expense, particularly in higher-end markets.
Harder to Paint
The textured surface requires more paint and more effort to achieve even coverage. Roller marks and drips can be harder to manage on knockdown compared to smooth surfaces.
Inconsistency Risk
Knockdown texture applied by inexperienced hands can look uneven or patchy. The technique requires skill to achieve a consistent pattern across the entire ceiling. Professional application is strongly recommended.
When to Choose Knockdown Texture
Knockdown texture is an excellent choice when:
When to Choose Smooth Instead
Consider a smooth ceiling finish when:
The Knockdown Application Process
Step 1: Surface Preparation
The ceiling must be clean, primed, and free of loose material. For new drywall, all joints are taped and given at least two coats of compound. For existing ceilings, any damaged areas are repaired first.
Step 2: Mixing
Joint compound is mixed to a specific consistency — thinner than standard mudding compound but thick enough to hold its shape when sprayed. The consistency is critical for achieving the right pattern.
Step 3: Spraying
Using a hopper gun or texture sprayer, the compound is applied in a random pattern across the ceiling. The spray settings control the size and distribution of the splatter droplets.
Step 4: Waiting
The sprayed compound must set for 10–15 minutes. This timing is critical — too wet and the knockdown knife will remove too much material; too dry and the peaks will not flatten properly.
Step 5: Knocking Down
A wide (18–24 inch) drywall knife is drawn across the ceiling in long, smooth strokes. This flattens the peaks of the splatter while leaving the valleys and edges intact. The knife must be kept clean between strokes for consistent results.
Step 6: Drying and Priming
The knockdown texture dries for 24–48 hours, then is primed with a quality primer before painting.
Step 7: Painting
Two coats of ceiling paint are applied with a thick-nap roller to ensure full coverage of the textured surface.
Knockdown Texture in GTA Homes
Knockdown texture is found throughout the GTA:
Frequently Asked Questions
How much does knockdown ceiling texture cost?
Applying knockdown texture costs $1.00–$2.50 per square foot. Removing knockdown texture to achieve a smooth finish costs $2.00–$4.00 per square foot. These prices include material and labour in the Toronto and GTA market.
Is knockdown texture outdated?
No, knockdown texture is considered a current and acceptable ceiling finish. While smooth ceilings are the most popular choice, knockdown is a respected alternative that many homeowners and builders still choose. It is far more modern than popcorn or stipple textures.
Can I apply knockdown texture over popcorn ceiling?
Technically yes, but it is not recommended. Applying knockdown over popcorn adds weight to the ceiling, hides potential asbestos, and does not produce the best result. We recommend removing the popcorn first for optimal results.
How do I repair knockdown texture?
Small repairs can be done with a can of spray texture (available at hardware stores) and a drywall knife. For larger repairs or precise matching, professional service is recommended. Matching existing knockdown patterns requires experience and the right equipment.
Is knockdown ceiling texture good for basements?
Yes, knockdown texture is a popular choice for basements. It hides the imperfections common in basement ceiling removals (uneven joists, utility runs) and costs less than achieving a perfectly smooth finish. It also helps mask minor moisture-related swelling.
Can you remove knockdown texture and make the ceiling smooth?
Absolutely. We remove knockdown texture regularly across the GTA. The process involves scraping or sanding the texture, skim coating, and finishing to a smooth surface. Call 289-806-1616 for a free estimate.
Whether you want knockdown texture applied or removed, Popcorn Free has the expertise to deliver perfect results. Call 289-806-1616 for professional ceiling services across Toronto and the GTA.
Understanding Different Knockdown Texture Patterns
Beyond the basic definition, knockdown texture comes in various patterns. The specific look is determined by the spray technique, the consistency of the mud, the size of the spray droplets, and the timing and technique of the knockdown process. Here are some common variations:
The choice of pattern depends on your personal preference and the overall style of your home. Consider the existing architectural details and the desired aesthetic before deciding on a specific knockdown texture pattern.
DIY vs. Professional Knockdown Texture Application
While it might seem like a straightforward process, applying knockdown texture correctly requires skill and experience. Here's a breakdown of the pros and cons of DIY versus hiring a professional:
DIY Knockdown Texture:
Pros:
Cons:
Professional Knockdown Texture Application:
Pros:
Cons:
Recommendation:
For smaller repairs, a DIY approach might be feasible. However, for larger areas or full ceiling applications, hiring a professional is highly recommended. The cost of fixing mistakes made during a DIY attempt can often outweigh the initial cost savings. Companies like Popcorn Free, serving areas like North York and Scarborough, offer the expertise to ensure a flawless finish.
Preparing Your Room for Knockdown Texture Application (and Minimizing the Mess)
Whether you're DIYing or hiring a professional, proper preparation is crucial for a successful knockdown texture project. Here's a checklist:
Taking the time to properly prepare the room will minimize the mess and make the cleanup process much easier.
Maintaining Your Knockdown Ceiling Texture
Once your knockdown ceiling is installed, proper maintenance will help keep it looking its best. Here are some tips:
The Environmental Considerations of Ceiling Texture Removal and Installation
When undertaking ceiling renovation projects, it's essential to consider the environmental impact. Here's what to keep in mind:
By taking these environmental considerations into account, you can minimize the impact of your ceiling renovation project on the environment.
Finding a Reputable Contractor in Toronto and the GTA
Choosing the right contractor is crucial for a successful knockdown texture project. Here are some tips for finding a reputable contractor in Toronto and the GTA:
Look for contractors familiar with the unique architectural styles found in Toronto neighborhoods like The Annex, Rosedale, or even older homes in Etobicoke, where specific techniques might be needed to match existing textures.
How Knockdown Texture Impacts Lighting Choices
The texture of your ceiling can influence how light reflects and disperses within a room. With knockdown texture, the subtle peaks and valleys create a softer, more diffused light compared to a perfectly smooth surface.
* Pot Lights: Knockdown texture can help to minimize glare from pot lights, making them a comfortable lighting choice.
* Chandeliers: The texture can add depth and visual interest when paired with decorative light fixtures like chandeliers.
* Natural Light: Knockdown texture diffuses natural light, creating a warm and inviting atmosphere.
Consider how your chosen lighting will interact with the knockdown texture to achieve your desired ambiance.
The Future of Ceiling Textures: Trends and Innovations
While smooth ceilings remain popular, there's a growing interest in textures that offer visual appeal and practical benefits. Here are some emerging trends:
* Hand-Applied Textures: Artisan textures like skip trowel and Venetian plaster are gaining popularity for their unique, custom look.
* Acoustic Textures: Textures designed to absorb sound are becoming more common in home theaters and open-concept living spaces.
* Sustainable Materials: Eco-friendly textures made from recycled materials are gaining traction as homeowners become more environmentally conscious.
Keep an eye on these trends as you plan your next ceiling renovation project.
How to Match Existing Knockdown Texture for Repairs
One of the biggest challenges with knockdown texture is matching the existing pattern when making repairs. Here are some tips for achieving a seamless blend:
* Identify the Pattern: Determine the type of knockdown texture (splatter, orange peel, Santa Fe, etc.).
* Use the Same Materials: Use the same type of joint compound and texture sprayer as the original application.
* Practice on a Test Area: Before applying texture to the damaged area, practice on a piece of cardboard or scrap drywall to get the pattern right.
* Blend the Edges: Feather the edges of the repaired area to blend it seamlessly with the surrounding texture.
* Consider Professional Help: For large or complex repairs, consider hiring a professional to ensure a perfect match.
FAQs about Knockdown Ceiling Texture
What are the alternatives to knockdown ceiling texture?
Alternatives include smooth ceilings, orange peel texture, skip trowel texture, popcorn texture (though not recommended), and stipple texture. Smooth ceilings are the most popular modern option.
How long does it take to apply knockdown texture?
Application time depends on the size of the area, but typically takes 1-3 days including prep and drying time.
Does knockdown texture affect home value?
In the Toronto and GTA market, smooth ceilings generally add more value. However, a well-executed knockdown texture is still acceptable and can be appealing to some buyers, especially if it complements the home's style.
Can I change the knockdown texture pattern after it's applied?
Yes, you can modify the texture by adding more mud and re-knocking it down. However, this can be a messy and time-consuming process.
What type of paint is best for knockdown ceilings?
Use a high-quality, flat or matte ceiling paint. A thick-nap roller (3/4" to 1") is recommended for full coverage.
Whether you're in downtown Toronto, the suburbs of Markham, or the western reaches of Mississauga, understanding your ceiling texture options is crucial for a successful renovation.
Whether you want knockdown texture applied or removed, Popcorn Free has the expertise to deliver perfect results. Call 289-806-1616 for professional ceiling services across Toronto and the GTA.
---