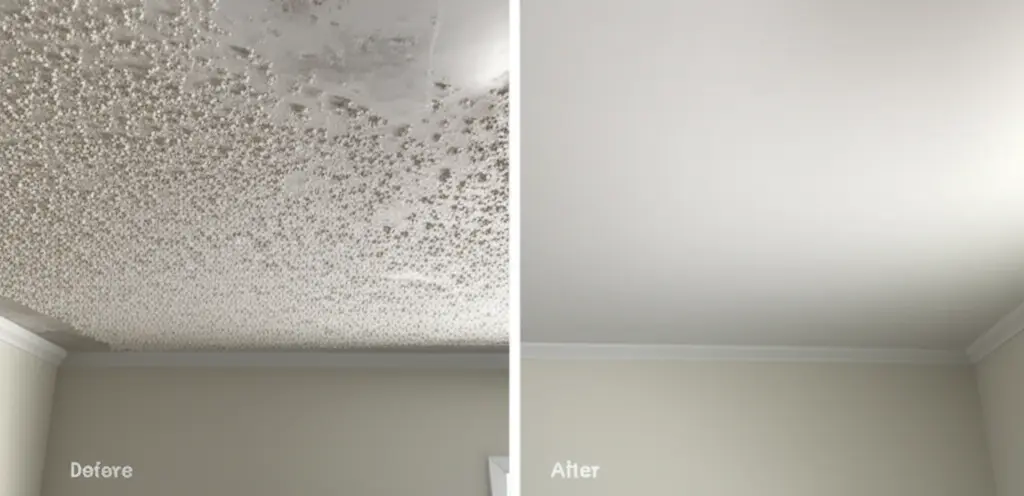
# Best Time to Remove Popcorn Ceiling
If you're considering home renovations in Toronto or anywhere in the Greater Toronto Area (GTA), one of the most common questions homeowners ask is, "What is the best time to remove popcorn ceiling?" This textured ceiling finish, popular from the 1950s through the 1980s, may be out of style, but it can still pose challenges for homeowners. Whether you're looking to modernize your space or planning to sell your home, understanding the right timing for popcorn ceiling removal is crucial.
Understanding Popcorn Ceilings
Popcorn ceilings, also known as acoustic ceiling removals, were initially designed to reduce noise and hide imperfections. However, they have fallen out of favor, primarily due to their dated appearance and the potential presence of asbestos in homes built before 1980. If you're considering removal, it's essential to know when to tackle this project for the best results.
Factors to Consider When Deciding the Best Time for Removal
1. Seasonal Weather Conditions
The weather can significantly impact your renovation plans. Ideal conditions for popcorn ceiling removal include:
Toronto and surrounding cities, such as Mississauga, Brampton, Vaughan, and Richmond Hill, experience varied weather. Planning your renovations during a mild season can save you time and ensure a smoother process.
2. Home Renovation Timeline
When planning your home renovation project, consider the following:
Cost of Popcorn Ceiling Removal
The cost of removing popcorn ceiling varies based on several factors, including the size of the area, the complexity of the job, and any additional repairs required. Here's a general breakdown:
It's essential to get quotes from multiple contractors in your area, such as Oakville, Burlington, Ajax, and Pickering, to find the best price and service. For assistance, feel free to call 289-806-1616.
Safety Considerations
Before starting the removal process, especially in popcorn ceilings in older homess, you must consider safety precautions. The presence of asbestos in popcorn ceilings guides is a serious concern. Here are some essential safety tips:
When to Hire a Professional
While some homeowners may choose to tackle popcorn ceiling removal as a DIY project, there are instances when hiring a professional is the best option. Consider the following:
Frequently Asked Questions (FAQs)
What is the best time to remove popcorn ceiling?
The best time to remove popcorn ceiling is during dry weather in late spring or early fall when indoor temperatures are moderate. This ensures optimal working conditions and drying times.
How much does it cost to remove popcorn ceiling?
The cost to remove popcorn ceiling typically ranges from $0.50 to $3.00 per square foot, depending on whether you choose DIY or professional services. For a standard room, expect costs between $600 and $1,800.
How can I tell if my popcorn ceiling contains asbestos?
To determine if your popcorn ceiling contains asbestos, you should have it tested by a certified professional. If your home was built before 1980, it's advisable to conduct this test before any removal.
Can I remove popcorn ceiling myself?
Yes, you can remove popcorn ceiling yourself, but it is essential to test for asbestos first. If asbestos is present, you should hire a professional. If not, ensure you have the right tools and safety gear.
What should I do after removing the popcorn ceiling?
After removing the popcorn ceiling, you may need to repair any damage to the underlying drywall. Once repaired, you can paint or finish the ceiling as desired.
For more information on home renovations and tips, check out our blog posts on home improvement ideas and renovation planning.
If you're ready to start your popcorn ceiling removal project or need assistance, call 289-806-1616 today! Our team is here to help you every step of the way.
By understanding the best time to remove popcorn ceiling and planning accordingly, you can ensure a successful renovation that enhances your home’s valu
Expanding on Understanding Popcorn Ceilings
Let's delve deeper into the world of popcorn ceilings. Beyond their initial purpose of sound dampening and hiding imperfections, these ceilings have a history rooted in cost-effectiveness and ease of installation. During the mid-20th century building boom, builders sought affordable and quick solutions to finish ceilings in new homes and apartments across North America, including the burgeoning suburbs of the GTA like Scarborough, Etobicoke, and North York.
The Rise and Fall of Popcorn Ceilings
The "popcorn" or "acoustic" texture was achieved by spraying a mixture of materials onto the ceiling. This mixture often included vermiculite, a mineral that, unfortunately, was sometimes contaminated with asbestos. The texture effectively masked uneven surfaces and required minimal skill to apply, making it a popular choice for builders.
However, as tastes evolved and concerns about asbestos grew, popcorn ceilings started to fall out of favor. Homeowners in neighborhoods like The Beaches, Rosedale, and Forest Hill began to see them as outdated and even detrimental to the aesthetic appeal of their homes. The rough texture also collected dust and was difficult to clean, further contributing to its decline in popularity.
Identifying Popcorn Ceilings: A Visual Guide
Not all textured ceilings are created equal. While "popcorn" is the most common term, there are variations in texture and application. Some might have a finer, less pronounced texture, while others are quite coarse and bumpy. Here's how to identify a true popcorn ceiling:
If you're unsure, especially in older homes in areas like Cabbagetown or the Annex, it's always best to consult with a professional for an inspection.
Diving Deeper into Seasonal Weather Considerations
The impact of seasonal weather on popcorn ceiling removal in the GTA cannot be overstated. Toronto's climate is known for its extremes, from hot, humid summers to cold, snowy winters. These fluctuations can significantly affect the success and timeline of your project.
Spring: A Promising Start
Spring (late April to June) offers a sweet spot with milder temperatures and relatively lower humidity compared to summer. This makes it an ideal time for removal, as the joint compound and paint will dry more evenly. However, be mindful of potential rain showers, which can increase indoor humidity levels.
Summer: Battling Humidity
Summer (July and August) in Toronto can be hot and extremely humid. High humidity can slow down the drying process of joint compound and paint, potentially leading to cracking or mildew growth. If you must remove popcorn ceilings during the summer months, ensure adequate ventilation and consider using a dehumidifier to maintain optimal indoor conditions.
Fall: Another Prime Opportunity
Fall (September to mid-November) mirrors spring in terms of favorable weather conditions. The temperatures are moderate, and the humidity is generally lower than in summer. This makes it another excellent time to tackle popcorn ceiling removal.
Winter: Challenges and Considerations
Winter (late November to March) presents the most significant challenges. Cold temperatures and low humidity can cause materials to dry too quickly, leading to cracking. Furthermore, keeping the house warm enough for the materials to cure properly can increase energy bills. If you choose to remove popcorn ceilings in the winter, ensure your home is well-heated and consider using a humidifier to prevent excessive dryness.
Local Weather Resources
Stay updated on Toronto's weather forecast using reputable sources like Environment Canada or The Weather Network to plan your popcorn ceiling removal project accordingly. Monitoring the weather will help you make informed decisions about ventilation and drying times.
Expanding on the Home Renovation Timeline
Strategically integrating popcorn ceiling removal into your overall home renovation timeline is essential for a smooth and efficient process.
Popcorn Ceiling Removal as Part of a Larger Renovation Project
If you're undertaking a comprehensive renovation of a room or your entire home in areas like Leslieville or Riverdale, removing the popcorn ceiling should be one of the first steps. This prevents dust and debris from settling on newly installed flooring, freshly painted walls, or new furniture.
Popcorn Ceiling Removal Before Selling Your Home
Removing popcorn ceilings can significantly enhance your home's appeal to potential buyers, especially in competitive markets like downtown Toronto. Dated features can be a major turnoff for buyers looking for a move-in-ready property.
Addressing this issue before listing your home can lead to a faster sale and potentially a higher selling price. Allow at least a month to complete the removal, repairs, and painting. This allows ample time to address any unforeseen issues and ensure a flawless finish. Consider staging the room after the ceiling is complete to showcase its modern appeal. Real estate agents in areas like High Park and Bloor West Village often advise clients to remove popcorn ceilings before listing.
A Deeper Dive into the Cost of Popcorn Ceiling Removal
Understanding the various cost factors associated with popcorn ceiling removal is crucial for budgeting and planning your project effectively.
DIY vs. Professional Removal: A Detailed Cost Breakdown
DIY Removal:
Professional Removal:
Hidden Costs to Consider
Getting Accurate Quotes
Obtain at least three quotes from different contractors in your area. Ensure the quotes are detailed and include all costs, including materials, labor, and any potential additional fees. Ask for references and check online reviews to ensure you're hiring a reputable and experienced contractor.
In-Depth Safety Considerations: Asbestos and Beyond
Safety should be your top priority when considering popcorn ceiling removal, especially in older homes.
Understanding Asbestos Risks
Asbestos is a naturally occurring mineral that was widely used in building materials due to its fire-resistant and insulating properties. However, it is now known to be a hazardous material that can cause serious health problems, including lung cancer, mesothelioma, and asbestosis.
If your home was built before 1980, there is a higher likelihood that your popcorn ceiling contains asbestos. It's crucial to have the ceiling tested by a certified professional before starting any removal work.
Asbestos Testing: The Process
A certified asbestos inspector will take samples of the popcorn ceiling and send them to a laboratory for analysis. The lab results will indicate whether asbestos is present and, if so, the type and concentration.
Asbestos Abatement: Hiring a Professional
If asbestos is present, you must hire a licensed asbestos abatement contractor to safely remove the popcorn ceiling. Asbestos abatement is a specialized process that requires specific training, equipment, and procedures to minimize the risk of exposure.
DIY Removal: Safety Precautions (If Asbestos is NOT Present)
If your popcorn ceiling does not contain asbestos, you can proceed with DIY removal, but it's still essential to take safety precautions:
Additional Safety Tips
Expanding on When to Hire a Professional
While DIY popcorn ceiling removal is possible, there are several situations where hiring a professional is the best and safest option.
When Asbestos is Present
As mentioned earlier, if your popcorn ceiling tests positive for asbestos, hiring a licensed asbestos abatement contractor is non-negotiable. Attempting to remove asbestos-containing materials yourself is illegal and extremely dangerous.
Large or Complex Projects
For larger areas or ceilings with intricate designs or difficult-to-reach areas, hiring a professional can save you time, effort, and potential headaches. Professionals have the experience, tools, and equipment to handle complex projects efficiently and safely.
Time Constraints and Physical Limitations
If you're on a tight schedule or have physical limitations that prevent you from performing the work yourself, hiring a professional is a wise choice. Popcorn ceiling removal can be physically demanding, requiring prolonged periods of standing, reaching, and scraping.
Ensuring a Flawless Finish
Professionals have the skills and expertise to ensure a smooth, flawless finish after popcorn ceiling removal. They can handle any necessary drywall repairs, priming, and painting, leaving you with a beautiful, modern ceiling.
Peace of Mind
Hiring a professional provides peace of mind knowing that the job is being done safely, correctly, and in compliance with all applicable regulations.
Alternative Ceiling Options After Popcorn Removal
Once the popcorn ceiling is removed, you have a blank canvas to create the ceiling of your dreams. Here are some popular alternatives:
Frequently Asked Questions (FAQs)
What is the best time to remove popcorn ceiling?
The best time to remove popcorn ceiling is during dry weather in late spring or early fall when indoor temperatures are moderate. This ensures optimal working conditions and drying times.
How much does it cost to remove popcorn ceiling?
The cost to remove popcorn ceiling typically ranges from $0.50 to $3.00 per square foot, depending on whether you choose DIY or professional services. For a standard room, expect costs between $600 and $1,800. Asbestos abatement will increase the cost significantly.
How can I tell if my popcorn ceiling contains asbestos?
To determine if your popcorn ceiling contains asbestos, you should have it tested by a certified professional. If your home was built before 1980, it's advisable to conduct this test before any removal.
Can I remove popcorn ceiling myself?
Yes, you can remove popcorn ceiling yourself, but it is essential to test for asbestos first. If asbestos is present, you should hire a professional. If not, ensure you have the right tools and safety gear.
What should I do after removing the popcorn ceiling?
After removing the popcorn ceiling, you may need to repair any damage to the underlying drywall. Once repaired, you can paint or finish the ceiling as desired. Consider adding new lighting fixtures to modernize the space.
What permits do I need to remove a popcorn ceiling in Toronto?
While a permit isn't typically required for removing a popcorn ceiling, you will need a permit if the project involves structural changes or electrical work such as installing new pot lights. Always check with the City of Toronto's building department for clarification based on the scope of your project.
How long does it take to remove a popcorn ceiling?
The time it takes to remove a popcorn ceiling depends on the size of the room, the complexity of the job, and whether you're doing it yourself or hiring a professional. A small room might take a weekend for a DIYer, while a professional crew could complete it in a day.
For more information on home renovations and tips, check out our blog posts on home improvement ideas and renovation planning. Learn more about our ceiling removal services in your Toronto neighborhood.
If you're ready to start your popcorn ceiling removal project or need assistance, call 289-806-1616 today! Our team is here to help you every step of the way.
By understanding the best time to remove popcorn ceiling and planning accordingly, you can ensure a successful renovation that enhances your home’s value.